Tuesday, November 30, 2010

A Kitchen Update: Update.

We have installed the high wall cabinets.


Pete has also demolished the original pantry/cabinet that was located on the opposite wall. Most of our kitchen belongings are sitting in half made ikea base drawers and we were able to fit the crockery and other large items in the cabinets. It was really tricky to patch the concrete wall behind the cabinet as it was the original unpainted concrete with a thick line of paint on the edge. I'm thinking this wall will be painted a dark grey colour, we will wait until the rest of the kitchen is in before we finish that wall though.


Spot the difference:

Trees Beneath My Feet

Check out the floor in the kitchen. When we moved in, the kitchen was lined in a wood-look vinyl sheet. It lifts up when we vacuum it. The grossest part is that it has been laid right over the top of the filthy 1965 original kitchen floor. (Also vinyl, but a thick stuck down like a tile sort). You can see from the torn off bit, that Toto has chewed and eaten it (bad bunny). The existing carpet has been laid over the original underlay too, some sort of heshin sack type material that frays and flys through the air when touched. (Yuck). The carpet is Nylon. Brownish, beigy pink. Under all this is the concrete floor which by the sneak peek is quite significantly chipped and damaged so may need a bit of patching before we lay the new floor.


The new timber floor is currently stacked up behind the sofa. It's another one of those gigantic, space engulfing items we purchased when we first moved in. Knowing good and well we weren't going to need a new floor for months, I bought them anyway. The bargain was too good to pass up. $400 for just under 30sqm of real wood! They're the click together sort but with a bit of extra glue needed for support. On the packet it reads southern chestnut but based on what I've seen, this could be in disguise. The colour is quite brown, and this isn't a stupid thing to say, because when you see the HUGE variety of timber available, theres pinkish, yellowy, orange, grey, blue, greeny, and white-like woods. Dark, light, and grainy woods. Thin, wide and long bits of wood. Its actually very hard to find just brown. The unique thing about this timber, (besides it being brown) is the little flecks of black through it, which I LOVE. Check out one of the pictures, it looks like a little peeping black eye.


Still on the shopping list is some "Acoustic Minimising" underlay. This is a special sort that reduces the noise to the unit below. Its about 4-5 times the price but necessary when in an apartment block. Strata usually demand it. I've heard horror stories of people having to rip up new floors because of noise complaints and often strata can reject timber floors altogether. Luckily were in an older block and other units have already got timber floors down so we knew it was safe.

We were tossing up laminate for a while because they look very realistic these days, theyre hard wearing and they're cheap. But you know me, I cant help finding a bargain.

Tuesday, November 16, 2010

Cashback Splashback

I've been thinking about the splashback in the kitchen. We have decided to go for tiles. They are traditional and are probably the cheapest option (aherm... I mean an inexpensive solution).
But you know what, I think they really ARE the best choice regardless of the cost. One (expensive) suggestion we've had, is to put wallpaper behind a glass splashback. I think this would look good, really uber trendy but uber pricey and besides, our unit isn't going for uber chic, more like retro cool meets modern science lab with a touch of Scandinavian sleek.

Something else I've seen is a mirrored splashback. I reckon the only people who have a mirrored splashback are those that don't cook or those that have a full time cleaner, because they are a pain in the backside to keep clean. You'd expect it'd be those that had the dollars to spend too, because I've heard this is the most expensive option. We stayed in a boutique hotel room once that had a mirrored splashback behind the kitchenette. It made me realise how impractical it was.

Anyway, back to the tiles. You'll have to click on the image to enlarge it to see the layout ideas. (The green is just to see the pattern. We will probably buy white tiles.)
For a while we were considering large tiles. Maybe marble. Yes marble. There's bargains if you know where to look and if have the patience of a stalking lion ready to attack a zebra, then you shall receive. So anyway, we have decided this doesn't work. They're not bright enough and wont match the benchtop.


Number 1 and 2 are similar. I DO like number 1. The brick pattern is bistro cool, and timeless I think, but maybe a bit too country farmhouse. Two words I never want to be involved in are "shabby chic" and "country farmhouse" lives dangerously close. Next door infact. This tile and brick look is everywhere now too so not sure if I want to follow the craze.

I really like the elongated tile in number two and keeping the tile brick pattern nods to the bistro but there's something a little 70's retro about it that I like. These tiles are generally inexpensive too but at $35 a square meter, its almost twice the price of the standard brick shape from diagram 1 (only $20 p/sm). I worked it out though and we'll need less than 4 meters easy so we don't need to buy much.

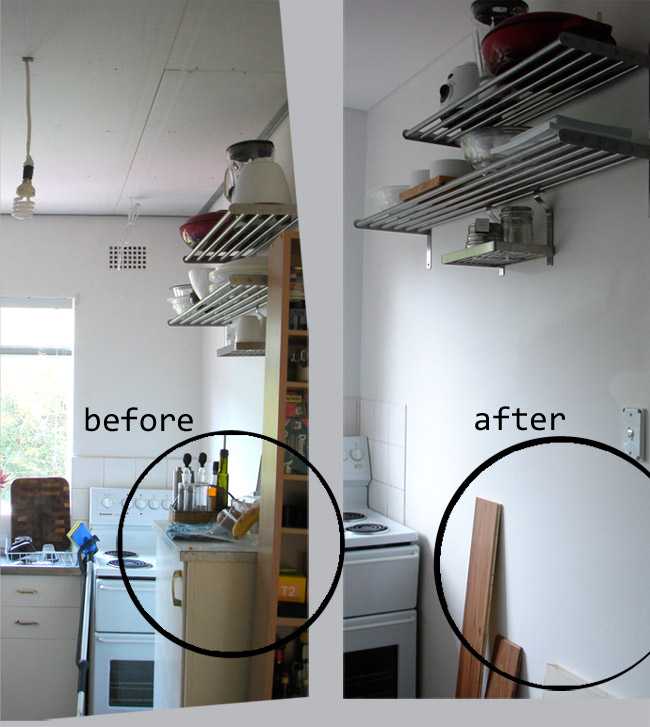
Are you as grossed out as I am by the layers of grout that's between the original tiles? It's like a clogged up sewer. The renaissance still-life feature tile is NOT doing it for me either nor is the yellowed power socket. I've lost my appetite. Here's a glimpse of the elongated tile from a sample I got from down the road at Classic Tiles.

Monday, November 15, 2010

Degaustration - Hors d'oeuvre

Somethings a little different to the way it was before. But just a bit. We put up our first cabinets. Doing them in installments so its not too overwhelming. All the wall cabinets are actually "Fan Cabinets" from IKEA but they are exactly the same as regular cupboards. They fit really well as a group of three. They are also a nice square shape and are really functional because the doors aren't too big. (56cm x 60cm).

Remember before:

And after:

We are going to place cabinets above for things that we use less often. Stylish AND functional. It's what IKEA is all about isn't it...These will be fan cabinets (35cm x 60cm). The doors arrive in a protective blue coating. The finish is Faktum Abstrakt in white. For a while I was thinking of making a couple of cabinets a feature by buying grey doors, but decided against it because you really cant beat just white for such a small space. Pete also concreted the routing job from when Bill the electrician relocated the fuse box.


The trouble with IKEA is working around their limited sizes. We wanted to build the rangehood INTO the cabinet so that it was hidden. This was something that we had in our rental at Cooper street and we really liked the look. Naturally IKEA does not accommodate for altering. They supply flatpack cabinets. Simple shapes, limited sizes.
Now how clever is this: The stainless steel pull out front of the rangehood was removed and replaced with a drawer front. (These can be purchased as a single item for a few bucks from IKEA.) It is in the same Abstrakt White finish as the doors. The rangehood is recirculating (ie: not ducted) by Omega.
Pete cut down the back and a shelf to fit in the fuse box. All shelves are purchased seperatley because the fan cabinets do not come with shelves.

Below: I realise now after taking this picture that I forgot to peel off a strip of the protective coating from the bottom of one of the doors!


And what did I do? I helped to lift one cabinet and went to work all weekend. I come home and discover this monolithic existence that has landed in our kitchen. Its pretty awesome to see our space change so quickly now.


Friday, November 12, 2010

In the Beginning

Thought I'd post these for those who have not seen our place yet. You can get a good idea of the layout of the apartment. The previous person that lived here did a pretty good job at making the place look nice without having the chance to change anything structurally. I remember the "for sale" ad said something about "vintage(?) charm".

These were the images of the apartment when it was on the market. They were taken by the realestate agent with a nice wide angle lens to fit everything in.


The retaining wall (big long white concrete wall) will be removed and a new "sandstone" wall will be erected from January. This is a BIG project that has cost us a lot of money in Special Levys but its something that we knew needed doing when we moved in. Its going to look much better too. I will keep you up to date in the new year for how things pan out.

Monday, November 8, 2010

Ikea? Ok Yah.

Very soon we will be working on the kitchen which will be very exciting because just look at the current state of our kitchen (chopped together because its so small, I cant fit it in one shot!!). I love cooking (almost as much as I love cookbooks)...anyway, its hard having anyone over for lunch or dinner because there's nowhere to sit and its been really tough cooking under these conditions.We only have about a quarter of our kitchen stuff unpacked from boxes. The hardest thing is baking cakes. Almost impossible but where theres sugar, theres a way.


After much consideration, months and months worth, then some reconsideration, this is the best layout we have come up with. Maybe not THE best priced, or THE most stylish or THE most functional but it is the most of all these things with only compromising on some things. If that makes sense. For example, the fridge will remain free standing, but because flat-pack DIY kitchens offer limited sized cabinets, nothing quite worked without adding a huge cost and dodgy patch ups. We could have gone for just three large overhead cabinets instead of six, but aesthetically six look good. We went for two sets of drawers even though drawers are probably the most expensive component to a kitchen, but these will be really functional (hate reaching to the back of cupboards for things that we will need to use often.)

The sink and hotwater system will stay in place to save on costs from the plumber. Wish we could have fit in a front loader washing machine, but not enough space. We wont be putting in a dishwasher and we don't use a microwave so saved on space there too.


We are going with IKEA because its well priced, offers a good selection of different shaped cabinets and they are actually pretty good quality. Plus they are stylish and have nice finishes.
We are going for a White Abstrakt finish, aluminuim kick-board (you don't see as many scuff marks) and laminate bench top (about a third of the cost of stone and half of wood). Minimal handles.

It's the Little Things

Throughout our renovations, there are many small yet tedious things that we attend to. I guess the difference with us vs an investor, is that they would just paint over things, where as we are not only trying to do things neatly and tidily from the start, but we are also trying to fix things that the last owner did. Plus attending to things that have been ignored for over 40 years. Naturally I can see why because this work is TEDIOUS and we spend so much time working on the fine details.

I have added some pictures of things that we have worked on just this weekend, though there is a long list of these kind of things.

We have been patching holes left from screws in the wall, wall edges where the cement has been chipped off, huge dints in the walls from puling out nails that attached the kitchen cabinets to the walls and washing walls that cad collected a thick layer of dust.


The original light switches and power points were still up. These were replaced with "primo" white light switches with added cover panels so you don't see the plastic plugs that cover the screws.


There are six air vents that had been half painted over and had collected so much soot I think they had stopped doing their job from as far back as 1975. After a powerful suck from the vacuum, we then with a small screw, we scraped off much of the caked on paint that the last owner did. Below shows a close up of the filth, and the below shot is a half worked on grate. The difference is phenomenal.

Friday, November 5, 2010

I see the light. Hallelujah!


After purchasing two white drum pendant lights on eBay, (similar to the ones in the image above) I tested them by holding them up over the naked lit globes to discover that they blocked way too much light. They would have looked great as a low pendant over a table for mood lighting with the assistance of downlights as a main light source, however we are relying solely on two globes to light most of our living space. I couldn't take them back as I bought them privately but sold them on eBay for about twice as much as what I paid so it wasn't much of a loss. It WAS an education on how complicated lighting can be.

I needed something that was transparent. Glass or perspex. An open base. Clear.


Bring in the lights below. I had my eye on one of these for ages and loooked around for the best price.
One of these is a designer brand (or at least a replica of a designer brand, which may I add doesn't sit well with me) the other is a regular no frills light from a regular no frills store.
One of these is heavier than it looks, the other a lot lighter. This is something to consider when purchasing lights as they need to be able to attach to the ceiling without to much downward pressure.
One of these cost a couple of hundred. The other is a display model with an extra 15% discount of an already low price.
One of these was the light of my dreams, the other has woken me up to reality.
Both of these share the same idea and a similar design aesthetic so to me it made sense to buy "the other".

Exhibit A: MattBlatt Replica Massimo Belloni Chi Pendant in Small for $195.00 each.
Exhibit B: A light from a light shop near the Hunter Valley. $75.00 each. Discontinued stock.

I COULD go into fine detail as to why the one above is WAAAAY cooler, but in the end its not worth it and really, I am very happy with our purchases. Whadda bargain! Keep an eye on these when I post after Bill finishes off the electrical work. Probably in the new year.


Thursday, November 4, 2010

Mirror Mirror on the Door...

Today we had our wardrobe installed by Impressive Wardrobes.
We went for mirrored doors with gloss aluminium runners and frame. So good to get so much stuff put away now. I was able to fit everything from the 6 drawer chest, clothes rack, elfa drawers, towels, sheets, shoes, suitcases, space bags, iron, ironing board and vacuum! I'm in storage heaven. After cleaning the internals and mirrors and putting everything away (I even have two spare drawers!) I sat on the bed staring at it for a good 30 minutes.


Remember, we had it ready to this stage just yesterday.


I've morphed the left and right in the "after" shot so you can see the layout.


Soooo tidy. - except for the vacuum on the bed.


Monday, November 1, 2010

Manhattan Apartment

Late in October, we had two plasterers come in and finish our ceiling. Very professional and very tidy, as well as reasonably priced considering they visited three times. They were a recommendation from one of Petes workmates. The best tradesmen are always from recommendations! The "after pictures" are of the ceiling after just two coats of undercoat. We probably could have gotten away with one but the 10L paint tin was on sale and 4 litres wouldn't have been enough so we thought we may as well use it up. We used Wattyl all purpose undercoat. The top coat is Wattyl "Manhattan Snow". Tinted using Wattyl TradeMax (the trade equivalent. Cheaper than the Design id range and the salesman assured us its pretty much the same thing and no harder to apply).


The wardrobe is now ready for the internals, rails and doors which will be installed this Thursday. Supplied by Impressive Wardrobes, they were the best price around and THE best service. We added some extra drawers with molded handles to the basic layout.


The image above, where the wire sticks down and has black tape on it, will be a pull switch for the light that is to be installed. We found a pull switch by Clipsal. They are actually pretty expensive for what they are, around $25.

The shadow line was a bugger, we had to fill the gaps with pollifilla around the whole perimeter of the unit. Its also a bugger to paint, getting into the gap with a tini-tiny brush. Awesome finish though. It looks really modern, spacious and clean. Just what you need for such a small space.


Still two coats of ceiling paint to go. Its a horrible job. Hurts your shoulders and back, I don't know how people do it as their full time job. Renovating is exhausting! The walls are much more fun with instant gratification. The image above is after just one coat of paint. So much nicer than that horrid yellow colour that was there before. If that was a paint sample it'd be called something like "smokers stain".

Cole & Son - Cow Parsley

Recently, we visited the Hunter Valley. Coinciding with this, I was watching a couple of auctions on eBay. Searching for Cole & Son Woods (I have a wish list that I often search for hoping to strike it lucky on a bargain) I discovered a seller from Berowra that had many rolls of wallpaper for sale for much less than retail price. I won 2 rolls of Cole & Son Cow Parsley in Charcoal and White. It wasn't enough to cover the wall in the bedroom but I'm still waiting to find woods for the bedroom anyway. This wallpaper is going to go on the half dividing wall between the lounge and kitchen area. I wanted to make this wall a feature wall anyway, considering a dark grey paint colour, so this will follow on with that colour, but much more dramatic.

For all those bargain hunters, I got two brand new rolls and extra off cuts for just $87.00. These rolls retail at around $250 each. We are going to save on costs by putting it up ourselves so some research on wallpapering will be needed.


Cole & Son Woods


We have also been looking at paint samples. There is a paint shop a few doors down from where we live. Most of our walls will be white. We were looking at Dulux White on White, a cool white.
The store down the road had Dulux available though their main product was Wattyl. After reading online forums about Dulux vs Wattyl it was clear that they are pretty much the same quality. The salesman from the store confirmed that Watyll was about 30% cheaper that Dulux too. The other thing that I really liked was the bold colours that were available, AND on the back of every sample it lists the CMYK and RGB equivalent. I've put these on the front of the scans to show you the equivelant, because surprise surprise, the scanner and screen make the colours look a bit skewed.

We purchased a cool white called Manhattan Snow.
CMYK: 3, 2, 4, 0
RGB: 243, 243, 241

Using 100% strength for the walls. Wattyl Low Sheen (the most common finish). We put a tint in the ceiling white too. Manhattan snow at 60% strength. So it will be more like a snow blizzard.


I love the paint sample names too, the idea of Castle Grey on our apartment walls makes me pretty excited, even though its probably not the right grey for us.
I'm also loving these yellowy greens. There is a very small patch of wall behind a door where I think a really bright colour would work well. Hard to explain but stay tuned for that one.