Friday, December 24, 2010

Oh Christmas Branch

After selecting the handles we were able to install them last weekend. The butt handles above look really good and are super sturdy.The middle cupboard has a push open feature as don't use that cupboard much, (It has our circuit board in there) and I think aesthetically it looks better without a handle. The handles below give a slight retro feel. All our finishes on the tap, fridge, oven and sink have a shared look. Solid with rounded edges.


We have added a new rail on the opposite wall. The spice rack from IKEA holds most of our small packets of tea (the spices stink up the whole unit if left out). Better to store the teatowels on the rail too rather than hanging off a door handle or oven handle. The pot holder works well as a paper towel holder.

There are two swatches from Wattyl paints on the walls. We have narrowed down our choice of grey down to two. Snowdonia, or Windspray. I think we are swaying towards the lighter swatch, (Snowdonia) especially seeing that the white we used is called "Manhattan Snow" its only fitting that we stick with the frosty theme.


Getting into the festive spirit, we put up a tree. Well more like I scabbed a branch from the neighbours bush and stuck it ikabana style into our spiked vase. A bit of mood lighting from our fairylights that were sitting dormant in a box under our bed all year.

Sunday, December 12, 2010

We All Live in a Yellow Submarine

I found this image a long while ago and always loved this combination of yellow and white. I like it because its utilitarian, its techno and retro in one. Its neon and makes an impact.


These swatches of green are by Wattyl. They made the shortlist as a feature colour I wanted to use in the bedroom.


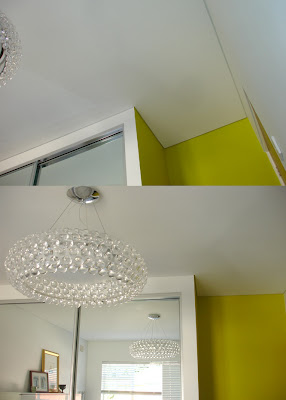
The colour we opted for was Perfect Flower. Its shockingly bright from the paint tin and after the first coat on the wall it just looked like fluro yellow! Now that we have finished off the third coat (The instructions say two but it really needed three for a totally streak free finish) It's worked out exactly the way I thought.


Here's a couple of shots of the finished result. What I love about this colour is how it almost glows at times. Its in a sneaky corner in our bedroom where half the wall is behind the door. The colour changes so much depending on how the light hits it at different times of the day. Sometimes it looks golden, at other times more like a deep lime green.

PS: That bedroom door is original and its life is just about over. Its been over-laquered, its got flaked bits and chips, dints and paint flecks on it. It's catching on the frame and scraping off paint on the architraves.

Friday, December 10, 2010

Switched On


Bill the electrician has installed all our lights now. A great idea for the light next to the bookcase is a pull switch. No routing in the concrete walls required as the switch is attached to the ceiling. Makes this corner nook feel like a library. Dont mind the extra mess on the side, as we are still finishing off the kitchen and still have some flat pack ikea bits and bobs that we need to install.
These pull switches are really good but are pretty expensive for what they are. I think this basic switch was close to $30. The halogen lights make the glass vases look like crystal!


The pendant in the middle of the kitchen is our main source of light, but we have included a second pendant in the corner near the food prep area and sink. Stops shadows over the bench and it has a nice "bistro" feel to it. I love the cord. Bill said it is the same cord they use for irons. We've used warm globes as opposed to cool globes to balance out the very slight blue tint from Manhattan Snow, (the Wattyl white paint we have used on the walls).


OK so at the moment the bedroom light is looking like a bit of a monstrosity, and it glows like a UFO too. The light globe is a tiny halogen but emits 300watts. Its like a white-out when its on. Need to buy a smaller wattage globe and fit it before we finish off the acrylic gems and frosted base cover. I'll post up an image once its done.
We bought a 100watt globe on the weekend and finished off the light. Here is the finished light.


Thursday, December 9, 2010

Get a Handle on it

We have thought about handles for a little while and even though they seem like a small and silly thing to dwell on, they can actually make or break a kitchen. Trust me, I have seen many a disaster kitchen from Google image search to justify the fuss. So many kitchens could have looked good if they didn't make such awful choices on handles. We're teaming up the handles with our current accessories. The fridge is a little retro, the oven and tap have curved, rounded knobs but we still want to keep things pretty minimal. We are being drastic and selecting two different handles. Apparently this is not the normal thing to do, but I am convinced this will look good.

So the cabinets above will have a sneaky little pulley type knob that sits on the edge of the door and is attached from the inside of the door. The drawers need something a little stronger, more sturdy. They will have a curved corner slightly stocky (not so elongated or square). They give the cabinets a bit of a retro feel which I think will give the kitchen a bit more personality. You'll see what I mean when I show you the pictures of the handles attached.

PS: We are buying our handles from United Kitchen Co. They have been very friendly. They make and install kitchens and sell a big range of entry doors, bedroom doors etc. There's a guy there called Phil, good customer service. He has the same thumbs as me which is really rare. There are specialty shops that only sell handles and door knobs. One in Leichhardt too, though they're rude - and pricey too I believe. (These things seem to go hand in hand I've noticed).
See so it goes to show the importance of handles, you can find such a huge range and shops dedicated to them!


Whats Cooking Good Looking?


The kitchen we had for the last couple of months was getting to be unbearable. Check out the before shots. YUCK with a capital Ugh!


With a fresh start. Demolition took a couple of days. The tiles were really hard to get off the wall. and the cork like underlay which protected the original vinyl tiles was a nightmare. We used the power drill mainly with a jackhammer type chisel end to remove it. It was incredibly noisy and we went from the blocks least liked to most hated neighbours. The plumber disconnected the hotwater system and modified the existing tap sockets. Bill the electrician removed the oven. (Which we've recently sold on ebay for a bit of extra pocket money.)


Peg worked through the weekend and I joined in on Monday/Tuesday just passed. We had 3 days to complete the kitchen and on the 4th day, installation of the hotwater system, sink and taps as well as the lights, oven, cooktop and rangehood installation. We were overtime. Rescheduled the electrician. Fit in the plumber in the afternoon instead of the morning. The modified cabinet in the corner was a killer and the benchtop was almost chucked in the bin ready to start again. The masons mitre join (which connects the two pieces of benchtop in the corner) seemed straightforward but was a real bugger to get right. Only one second chance for a recut (which was really a trim) to realign or the whole slab would be history. It worked out in the end but it was one of the hardest tasks of the kitchen building process.


So this is where we're up to. ALMOST finished the most of the cabinetry. Waiting on a few cabinet drawer fronts from IKEA and eventually a splashback and floor will slot in. Handles are in the works and will be attached soon.