Wednesday, September 8, 2010

The Bright Lights of Modernity

Currently, the lights in the apartment, (all but the bathroom light) seem to be original. They are brass and frosted glass, stuck to the ceilings like the first wave of oyster lights. They are not retro chic, vintage cool or period charm, so they must go.

We started the light journey into looking at LED down lights. After all, we were fitting a new ceiling, so we could take advantage of making life easy and installing them at the same time, before the plasterboard got in the way. After researching into it, mainly on blogs, the process it seemed would have been expensive, fiddly, risky and less effective than you may think. LED's are a fairly new type of globe, especially to the residential market. Each globe uses a very small amount of wattage to produce a massive amount of light. LED's can start and range up to 3,4,5 watts, the equivalent of a regular halogen down-light uses around 40-50 watts each. PLUS an LED globe lifespan can last for many years. (I've read up to 50,000 hours. That's about 6 years if you left it on 24 hours a day!!!)
Now here's the "BUT" and indeed it is an important one because we wont be installing LED down lights because of the buts. Each LED down light can cost around $80-$100, omitting 9 watts of power with a 3x3 watt globe. The light is very directional and lights up with a narrow beam rather than as a sheet of light. The light can also look quite blue, the newer "warm light" ones looked VERY yellow and artificial. Installing energy saving globes (that's the common spiral ones that were all used to now) into regular down light fittings were another option, however many people found that they took a long time to warm up as the globes are so small. A forum speaker said it took 30-60 seconds to light up, depending on how cold of a day it was.
As for regular down lights, by law you need to have a gap in your roof of 100mm (so we would have had to lower the ceiling by more than we wanted) because of potential fire hazards. There was no way I was installing hot little burning embers in the ceiling. (Plus they output waaay to much energy which was the reason behind the LED saga in the first place.


Here is our solution:
For the bedroom, we purchased this lovely bit of bling. They were selling this in the shop for around $500. I bought the very same from a guy in Waterloo who was selling it on Ebay for $200 (I got him down to $150 though!). He bought it back from Hong Kong but couldn't install it because it was too heavy. Its VERY heavy actually, though made out of acrylic. Our ceilings being concrete will be able to withstand the weight.


Something similar to this was purchased from Luminous Lifestyle. These spot lights are a new addition and will sit next to the shelves, lighting up the dullest corner of our apartment.
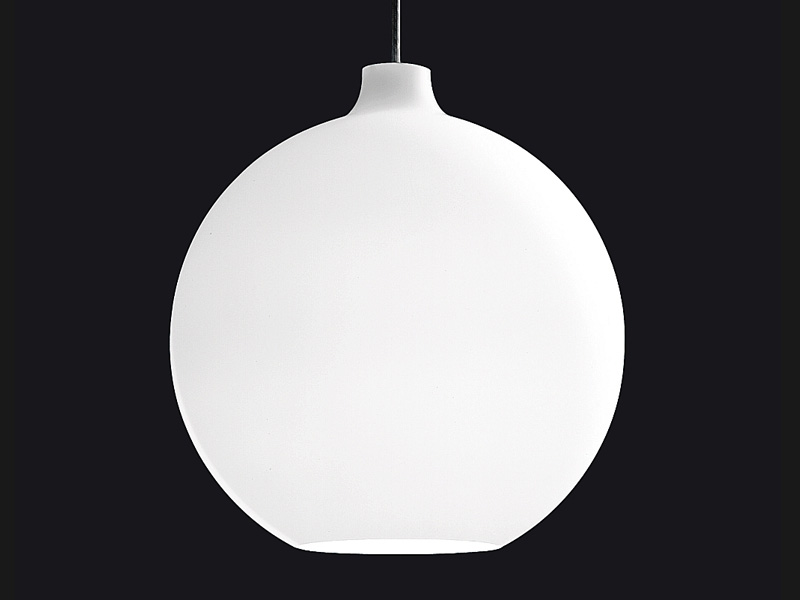


Similar to this Louis Poulsen "Satelitte" light, a timeless design from the 50's, we purchased two lights to sit as spotlights over the prep area once we install our new kitchen.


I found this image online as inspiration for two drum lights to go in both the lounge and dining area. Most pendant lights I have found only have one globe with a maximum wattage of 100, (That's 20 watts with energy saving globes.) and I'm not sure if its going to be bright enough. Need to test this out and then go shopping so were ready for the electrician. Hes coming this Tuesday to start work.

Wednesday, September 1, 2010

Besta Burs Storage Solution

During our shopping spree at IKEA a couple of months ago, we were looking at storage solutions. Getting things off the ground when your in a small space is a great tip. If any store understands small spaces and storage, its IKEA. Now don't think our house is going to be an IKEA house. because yes I admit there's a lot of crappy stuff there (like signed framed Matisse prints and canvas art) and poor quality stuff too so we were cautious in our selection. This wall storage is called Besta Burs and its intended to store DVDs above your 1800mm wide flat-screen TV, but seeing as we don't have a TV or many DVDs we were planning on putting it above the computer for office storage.
However, it didnt really suit and after we put it together, we couldnt take it back! so we looked at options around the unit and felt it was well suited above the bed. About the same width as a queen bed and easy to reach, it now is used as a medicine cabinet, also storing out hairdryer, tissues, haircare, toiletries - all things that we wont be able to fit in out TINY EN-SUITE SIZED bathroom. After much convincing Pete agrees it looks pretty good too.


The swatch of paper is wallpaper by Cole and Son. We are pretty sure this is print that we are going to use to wallpaper this wall behind the bed in the bedroom. Will our house look like a Cafe? Maybe. Will it look dated in a few years? Perhaps. Is it money better spent on something else? Possibly. But every time I look at it, I will feel really happy and may even sleep with my head at the base of the bed just so I can sit and stare at it for many happy hours.

Rondo Covers Vermiculite (Popcorn ceiling) - Part 1


OK. So this is the first major job that we have been tackling in the unit. (When I say we, I mean Pete mainly, he's been working on this stuff while I am at work on the weekends.)
When first inspecting the unit the thing that screamed YUK was the popcorn ceiling. We all know what this stuff is right? Its called vermiculite, and it was really popular in the 60's/ 70's. Popular because it was used as a fire retardant, insulator and ceiling leveler. I guess it was the cheapest, easiest way of covering a ceiling.
When researching how to get rid of it from online forums, it was apparent that this stuff had to stay. Removing it was not an option and Strata probably wouldn't want it removed anyway because of the fire safety and noise issues. There were two options. The inferior and cheaper way was to just paint it white, as often they are left as concrete grey, or faded to off yellow. Painting it requires a spray gun and heaps of paint. It soaks it up. I think the previous owner may have done this in the past because the ceiling is actually fairly white, so you can see from the before pictures, it wouldn't improve much by painting it. The only option then really was to cover it.
We discovered two ways. There is a company out there in Sydney that covers it with a thin film of stretchy material, attaching to the sides with cornices. Kind of like clingfilm. Its a cheaper option and quick but not as durable as plasterboard and with a slight sag in the middle of the room. Possibilities of it being punctured too.

Insert Rondo. I discovered this from an online forum as it seemed many people had the same problem and didn't know how to DIY. Its a big expense getting someone else to do this job, and I must admit, it IS a big job and understandable why they would charge so much.
Rondo products are like Meccano for adults. They are used in a lot of commercial buildings to add a lower suspension ceiling.

Main factors:
  1. You will lose about 100mm height on your ceiling. Luckily ours were 2600, (as are a lot of ceilings built in the 60's).
  2. You need a pretty powerful drill to drill the hooks into the ceiling. Pete had to buy a second one as the first one he bought wasn't powerful enough, you need one that has a "jackhammer" movement.
  3. There are many components and it seems confusing but that's only because the parts are used for many applications and there is something suitable for every job. In our case, we only needed 4 parts.
  4. If you live in Sydney, Grayking is where you can purchase Rondo products. Talk to Phil, he was really helpful and explained everything to us.


We had to bring in the furring channels though the balcony, they were so long we couldn't fit them up the stairs! (That's the metal rods you can see in the picture below)

The wood isn't part of Rondo, but was purchased from Bunnings to frame the built-in wardrobe. Pete has been working on this at the same time, as the frame will be really sturdy because its attached to the concrete ceiling and not the plasterboard.

Sunday, August 22, 2010

Bargins

Thought Id mention a few things that we have sitting around the apartment at the moment that are waiting for a home. Currently sitting in boxes, there are many items in particular for the kitchen that I have bought as bargain buys.
Firstly, this is an OVALE kitchen sink mixer. I love the square shaped spout but with rounded edges. I also purchased the bathroom sink mixer and shower mixer at the same time on Grays. All purchases have been an absolute bargain. The induction cook-top and white oven by SMEG are also still in their package, purchased from Grays and I cant wait to bake! I love the three burner cooktop (who has all 4 burners running at once anyway?!) and the semi-retro nobs on the oven. Works really well with our semi retro Fisher & Paykel fridge that we will be keeping.


A great buy on the weekend was our rangehood and sink from The Good Guys. This Blanco sink was sitting on its lonesome out of its box crying out for a home. Its quite unique because it has an overflow drainer which is a bit weird but probably why it had not been picked up by someone else. Perfect for us though because the drainer has nice lines, the edges are not too round, not to square and the bowl isn't too deep so extra storage in the cupboard underneath, plus it already has the tap hole cut out ready for installation.

Wednesday, August 18, 2010

The Miraculous Arrival of the Wardrobe Wonderwall

I left for work on Saturday to leave Pete to attack the bedroom solo. I dont know how he managed it on his own but for 8 hours, he managed to add a wall and install all the hooks into the bedroom ceiling. These hooks will be explained later when we will post on "Rondo".

This wall is going to be the right hand side of a built-in wardrobe where the left side is the existing wall of the bedroom. We decided on a wall as this is the best looking way to install a built-in, it makes it look like the built-in was there all along. The other option was a built-in with a panel on the right hand side.

We checked out Impressive Wardrobes in Bankstown on Sunday. They had really low prices so I was eager to see if their quality and service was compromised. It turned out to be a great shopping experience. The guy that served us was really nice (no bull). The quality was really good too. We are going for mirrored doors, with gloss silver frame and trim. Our bedroom is small so any illusion of space will help a lot. The wardrobe will be 66mm deep and about 2000mm wide, 2400mm high and 2 door.


The Little Hutch That Could

We were after a retro 60's sideboard/hutch. I had my eyes peeled on ebay but had noticed a lot of people were cluey to the value of them. The nice ones, (well restored and well looked after) were selling for hundreds. We found this little baby from a girl selling for cheap. We paid $70 for it, needed a bit of work to jazz it up. I pulled the small shelf from the left hand cavity and found some retro wallpaper on ebay too for $2 and used it to line the inside of the sideboard. Painted the legs with Haymes semigloss black enamel after an undercoat and used steelo soap pads to clean the handles. Check the second photo to see how much shinier they come up.


It worked out well for such a budget makeover. Pete now has his records stored in it and has his turntable on top We need to get in an electrician to add a power point to that wall though so at the moment the turntable is out of order. The painting leaning on top is a lino print made by Jenny from high school that we've carried on every move and it has always brightened up our apartment. Its the perfect size to sit on top of the sideboard.

Monday, August 9, 2010

Right Blind, Left Blind


When we first moved in we were pretty grossed out by the window dressings. The kitchen window had those old fashioned, lacy, scalloped half drop curtains that would have been here as an original item. It, as well as the sheer lacy curtains on the lounge and bedroom windows were brittle, yellow and a bit stinky. Over this, the lounge had yellowed calico curtains that filled the whole height of the window to floor and were also in a gross state.
It took about 5 minutes to dismantle the hooks and take down all the window dressings. We were left with the original aluminium venetian blinds. They didn't work too well and were in a poor state. They were an alabaster colour (which from researching new blinds I have discovered it is an off white, yellow colour.)

Before images as above, and after images below...


It was difficult deciding on what was the best option for blinds.
We looked into:
Roller Blinds - A bit too "officey" and cant let in a bit of light, its all or nothing.
Roman Blinds - Issues with the material gathering when fully open and a big drop of fabric when the blinds are fully open.
Wood (wood like) Venetians - Look great and are actually not too expensive but are pretty heavy and can droop in the center of the window if the window is quite wide, (like in our lounge).
25mm aluminium - These are slimmer than the ones we went with and are probably the cheapest option. The ready made ones are really flimsy and can dimple very easily. Plus you cant choose what side you want the cords on which is annoying.

We went for 50mm Aluminum Venetians. I spent a lot of time looking at 25mm blinds as they were half the cost of the 50mm, but the look of the 50mm was fitting for the building, and our unit.They are thicker and stronger and because they are wider, it means there are less slats so when they are fully open there is not much of a drop in the blind at the top of the window.
I got a quote from a blinds place down the road, they wanted $1600(!) and their service was bad.
I contacted Kresta because they had a sale on. They offered custom made 50mm slats but made by a different company. I tracked down that company and cut out Kresta, saving me about $500.
They are called "blinds on the net". We needed to self measure and install and order online. Delivery was free and the instructions online were pretty clear. They sent samples in the mail free of charge too so you could see that materials they were using. They're pretty good. The top covers are a bit bare, and the mechanism isn't perfect but overall I'm happy and would recommend them.


^ splitting the blinds in the bedroom because one side has a door which is used more frequently. This keeps the blinds lighter and easier to manage. Bottom image: New blinds, old kitchen.